New Astro City Refurbishing
Table of Contents
I own a Sega New Astro City arcade cabinet. In 2025, following the announcement a company would begin to produce LCD displays suitable for use in the cabinet, I decided to properly refurbish it.
Blog posts made on this subject have been compiled into one page (this page).
As the project continued, some decisions were abandoned, and planned changes were discarded. When I finally finish the job, this page will be rewritten entirely.
The last update to this page was 2025-05-21, and the cabinet is currently awaiting termination of the new JAMMA harness with AMP-UP connectors.
2025-01-29: Goals
Many years ago, I bought an abused Sega New Astro City arcade cabinet. The outer casing was marked all over, there were spots that had been painted with what looked like matte emulsion, the loom had been sampled by rats, and the power supply was half dead.
I cleaned it up, sprayed it with typical plastic paint (I believe I used the Plastikote that comes in the grey cans), made up a new loom, replaced all sorts of bits and bobs, and eventually ended up with something that looked quite new. Around that time, I actually considered doing this as a side business - Piconet Ltd (aside from being a reference to my aborted masters thesis), was originally intended to restore arcade machines. Even now, my loft is filled with wonders like spare Blast City control panels, Astro City bezels, bits off a Nanao MS9-29, and so on.
Anyway, I did some house-moving last year, and in the process, the cabinet (which wasn't painted at all well, I should admit), recieved some nasty bumps. Mostly just around the area the control panel meets the front frame. The paintjob I'd settled for, while very even, was thick. Thick enough repairing the cosmetic damage would involve a meaningful amount of filler. So I left it.
In the last week or so, I've become the owner of a Crumar Mojo 61 Organ (including the lower manual). This took the cab's place in the bedroom, and moving the cab was, as always, a lot of work. This led to me deciding to sell it on. Until I found out there's an upcoming production run of 27.5” LCD displays intended to be used as 29” CRT replacements. No 60KG CRT, no problem.
The Job
So I'm keeping it, and I'll be replacing the screen. But the replacement screen is potentially months away - pre-orders aren't going to open until February, and I have no idea what the price may be. So for now, I want to clean things up. Really go over it properly. Which involves, I think, the following work:
- Refinishing the exterior:
- Stripping the old paint I added.
- Scrubbing down anything I find under it to give a clean surface
- Priming it
- Painting it
- Replacing decals/stickers:
- Side banners
- Insert coin
- Restoring the power supply:
- The speaker amp doesn't work at all.
- I could do with building a new loom.
- I just fixed enough for it to be useful, last time.
- Restoring the display:
- Recapping would be good.
- Even if I'm replacing the display in my cabinet, someone will buy it.
- If I can't be bothered replacing all the caps, I'll at least confirm the ones there are working.
- I've already ordered a new remote board already.
- Replace the following:
- Display (when possible)
- Speakers, likely with a pair intended for in-car use.
- Coin mechanism to take new-style £1 coins.
The cost
I don't know how much it will cost. From the time I was looking at this as a business, I managed to procure a lot of bits and bobs - AMP-UP connectors, speaker diaphragms, door locks, etc. But I know I don't have certain things, and I know I'll be spending money on them shortly. At least for the refinishing job, I'm looking at the following:
- Paint stripper to remove my old work.
- Sanding sponges / finishing Pads for surface preparation.
- A HVLP Spray solution
- Primer
- Brilliant white gloss paint
Specifically, probably:
- Biostrip 20. £20/L.
- Sealey HP1523UF Abrasive Finishing Pads, £15/10 pieces. I use these for other things and they last. I just happen to have ran out recently.
- Wagner XVLP 3500. £380 with fine (varnish) and standard (enamel) attachments. I've wanted a spray solution for varnish long, long time. But maybe I'll find someone willing to lend me the tools.
- Hempel Primer Undercoat, £38.50/2.5L.
- Hempel Brilliant Gloss Pure White, £53.50/2.5L.
Obviously, the Wagner and Hempel gloss white are up in the air for the moment. I'm really not sure whether it'd be worth using boat paint. The cabinet is fibreglass, boats are regularly fibreglass, the paint is for boats. The big benefit is that unlike automative paint, it's one-part, so I'm not working out ratios. The benefit of the Wagner is that it comes with two spray solutions, one for varnish (which would be fantastic for the woodworking I do), and one for paint. It also has one for typical emulsion used indoors that I could buy later on. But it is a lot of money to spend.
The undercoat I've used before, and I think it'll be a good solution. In my uninformed opinion, I don't think the primer matters much here. I'm not putting my cabinet in salt water.
The stripper I haven't used before, but it's difficult finding paint stripper safe to use on all the materials that make up the cabinet. The bottom doors are metal, the control panel and frame is fibreglass, and the speaker shroud is plastic (I think). Paint Predator, with its bad-ass name, melts plastic. Bartoline I've also used - they don't recommend use on plastic either. I'll be making a point to do the stripping in the house, so I can check on it every twenty or thirty minutes.
Next steps
Well, the stripper and finishing pads are ordered. So the next update will likely be the stripping process, and what, if anything, went wrong. Hopefully it will just be a boring before-and-after.
2025-01-30: Stripping Paint
Stripping paint. It's Thursday, I'm not working, and I have paint to strip. The things I ordered yesterday have turned up, so now for the hard work. The rest of this post was written in real-time, with the odd notes I want to record for later use. I'm stripping the front frame and speaker bezel.
Prep
It's around quarter to ten, 9:45AM. I've taken the upper-front of the cab, including the speaker bezel, and moved it into the dining room. Takinbg screws out, I'm starting to think I should just replace most of them. The brass screw heads are quite worn, though not unusable. Some are missing. I should measure them with the calipers and replace all of them when I put things back together. The marquees have been stashed in the office in a safe place. The back-sides scratch easily, and fixing up anything other than the black parts is hell, so I'm being careful.
There's a broken bit in the display bezel, right at the top. The washer will prevent that being an issue, but I should probably dig out some epoxy putty and repair it. There's a spare in the loft, but I'm not going to touch that yet. The display bezel is black, in relatively good condition (one small mark) - I never painted it, so I'm not doing anything else with it today.
With everything laid out on a thin painter's sheet, I applied a relatively light coat of the stripper. It does say to use a generous amount, but I'm taking things slowly. Application made with a wide brush. The speaker bezel is plastic, so I'm keeping an eye on that specifically. It isn't a part that'd be difficult to make with my 3D printer, but let's try to minimise the work.
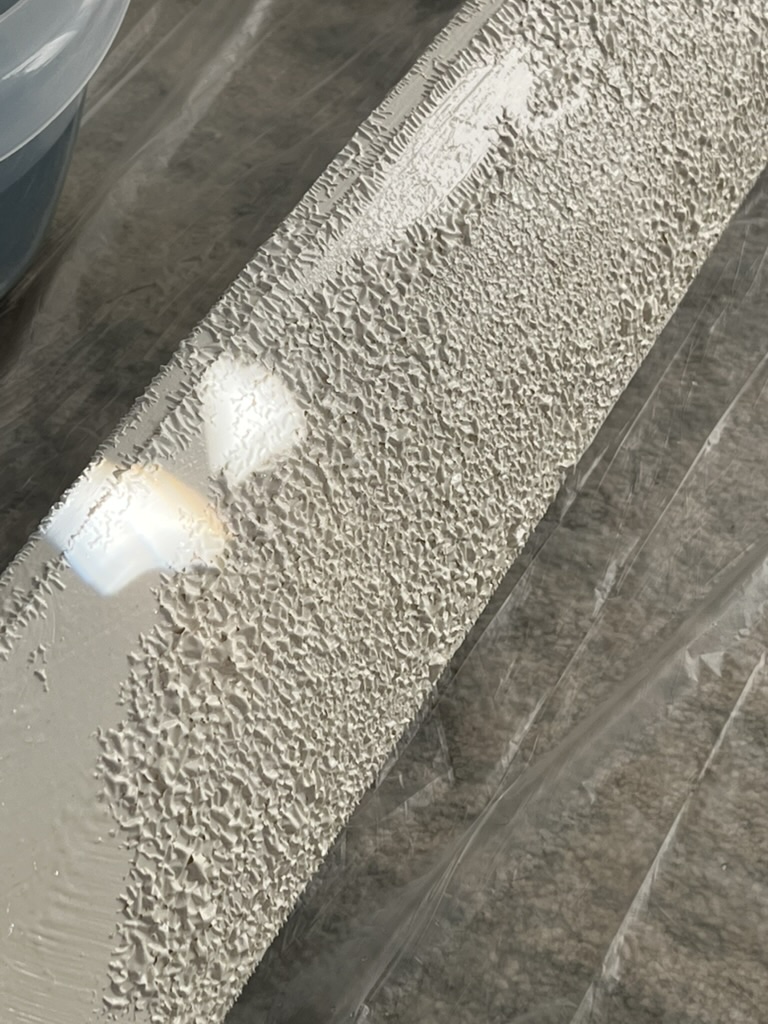
Figure 1: The front frame with stripper applied
Stripping
The paint underneath is starting to bubble up. I scraped a bit off the speaker bezel, just to make sure it was only the paint coming up. It was surprising to see the original yellowed plastic I covered up all those years ago, and it made me feel slightly better about my haphazardous paintjob. The bubbling is inconsistent. I'd assumed the thickest layers would be first - specifically the part where the frame mates the control panel. But it's actually the sides. I think I may need to buy more stripper. Still checking every 25 minutes.
11:30AM
I took the opportunity to scrape off some of the bubbled paint, to see how deep I was going. Unexpectedly, the stripper seems to be managing to get right down to the fibreglass in some places. I've resigned myself to multiple rounds of coating and scraping - the closer I can get to the fibreglass, the less 1990's paint-and-tar dust I'll potentially breathe in when I start sanding before the primer coat. Second, thicker coat of stripper is on, and I've ordered another 1L tub. The control panel has a finish about as thick as the parts I'm doing now, but the lower-front and back are quite thin, so I think this will be enough.
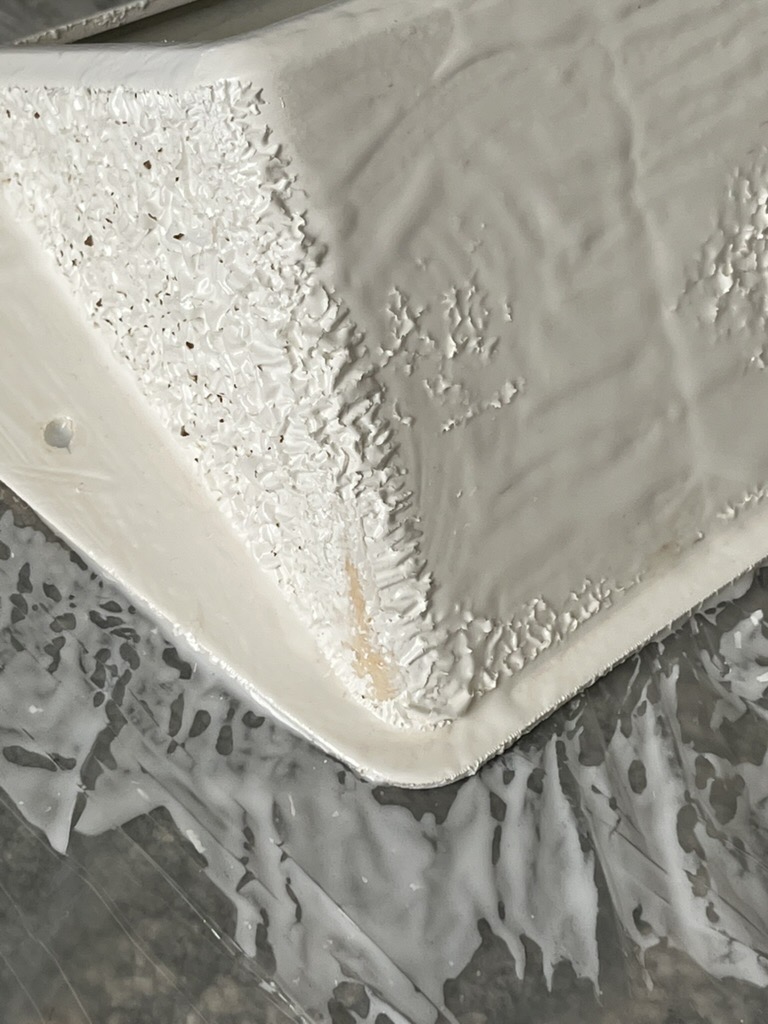
Figure 2: Paint bubbling on the speaker bezel
1:00PM
Third coat is on. Few notes - scrubbing with water is far more messy than I thought. I had to drag the bits outside to use the hose. I'll stick to scraping and kitchen roll until I'm satisfied there's no more stripping to be done. The areas that showed no indication of bubbling have been roughed up with a 120 grit sponge. I at least need the stripper to work for the thin structs going from side to side - they flex quite easily, and sanding runs the risk of cracking them.
2:30PM
Last coat on. I think. I'm out of stripper. If it isn't the last, I'll just live with however far I've gotten with the speaker bezel. I don't actually need to get down to bare substrate, after all. Just deep enough I can prime the surface. The black fibreglass looks surprisingly nice - if not for the differences in materials, I might have been inclined to just varnish it.
4:00PM
I've taken the last coat off the speaker bezel, the finish is… rubbery? I suspect that's less to do with the stripper contaminating the plastic, and more to do with the paint (which was paint for plastic) adhering something awful. I've scrubbed it down with warm water, and rubbed it down with a towel so it's at least dry. The stickiness is gone, so I'll leave it for a day or two and then finish it off with some sanding.
The fibreglass front is mostly done. I've also scrubbed and rubbed it, but I've put an (actual) final coat of stripper on the few spots where a thick layer of paint remains. Like the speaker bezel, it'll get a last scrub and rub, and then left to dry for a few days before sanding. Although it needs it less than the speaker bezel.
7:00PM
Removed the last bit of stripper and wiped everything down with kitchen roll and warm water. I'm not terribly worried about leaving slight stripper residue on the surface, as I'll be wiping all the metal and fibreglass parts down with spirits prior to a light sand.
The rubbery surface of the plastic speaker bezel has hardened - I do think it was just a layer of paint that had softened but not detatched from the plastic. I tested how it sanded with a fine finishing pad, and it came out well enough to apply primer.
Total cost for this project so far is around £40. There are other expenses, like sanding stuff, clingfilm and kitchen roll. But the main cost is certainly the 2L of Biostrip 20 stripper.
2025-02-09: Priming
Primer! It's Sunday, one day after applying the first coat of primer. I'd thought about doing another play-by-play - like in part 2. But couldn't be bothered. So you're only getting the result, rather than the process.
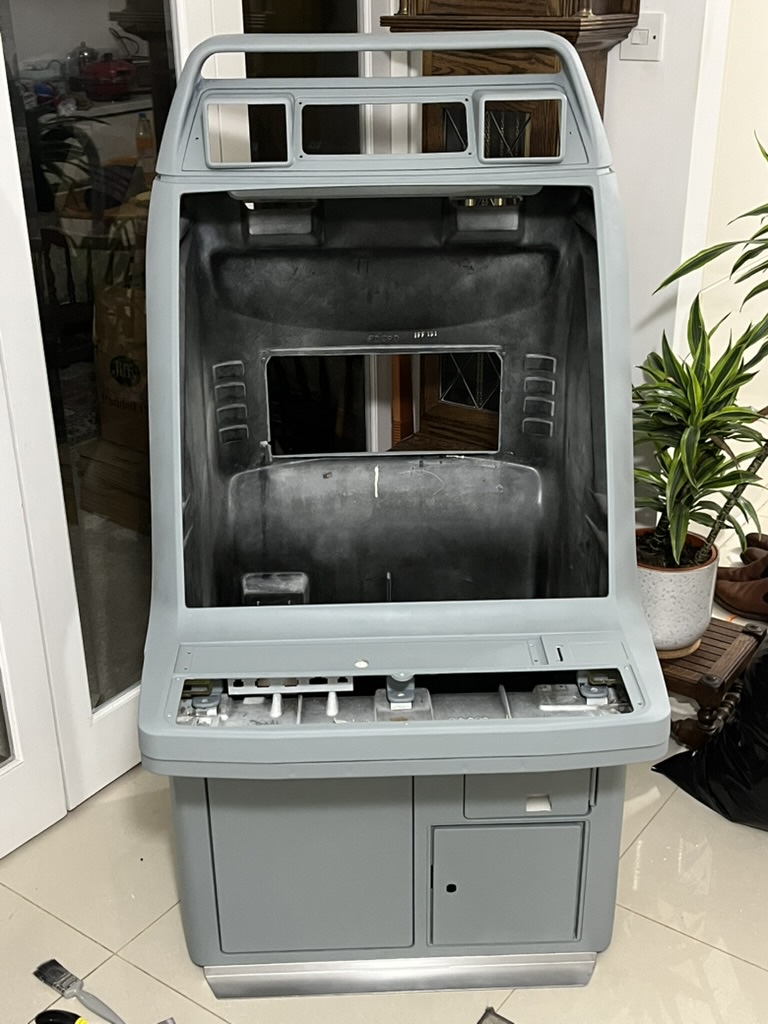
Figure 3: The primed and loosely-assembled cabinet
Priming
I'm using Hempel's Primer Undercoat, in a very Playstation-esque mid-grey. Going by the manual, it should be touch dry in around 5 hours, and ready for recoat in 6 to 96 hours?. Well, whatever, I'm in no rush.
My goal for this weekend is to get a single coat on every part. Then next week I'll sand them down and give them a second coat. The manual implies that two coats is enough for glass reinforced plastic, and I'd be inclined to agree. I actually think it looks quite nice with just the primer, and depending on how it ends up looking and feeling, I could see myself slapping a clear-coat on top of it. I probably wont do that. But I could. And I might.
Painting
Once I've finished the priming, it'll be the big job. I think I'll make a point to take a day off work when the weather is fantastic (or as fantastic as English weather can be in February/March). The paint I've decided to go with is Hempel's 10121 Matterhorn White. Which is rgb(244,244,244). Not quite VW Candy White, rgb(220, 219, 212) - apparently the original colour of the cabinet. But it trends closer to pure-white, which seems to be what most people expect anyway.
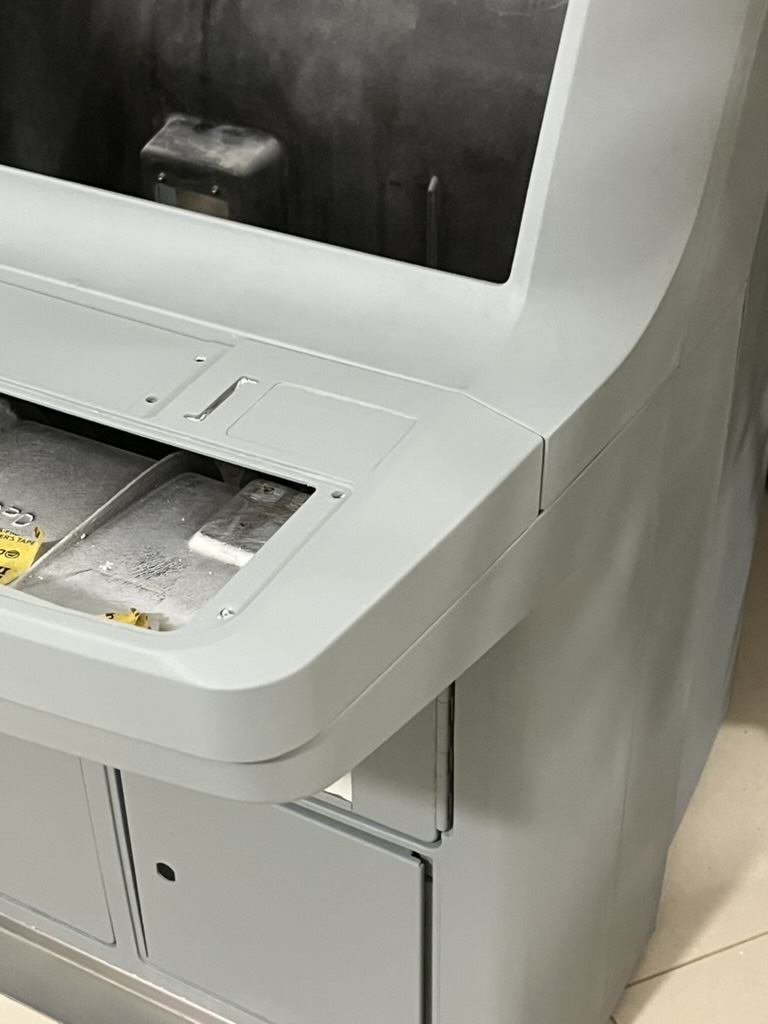
Figure 4: Close-up of the primer on the control panel
I've decided I'm going to roll and tip rather than spray. I spent an unfathomable amount of time comparing compressors, airless spray guns, nozzles and other bits-and-bobs. And every time I felt I had a working solution for spraying, I'd do a final check and find out Wagner products are shite, Graco products (like the A30) only take nozzles up to a size 15 (when I need a size 19-21). And then I'm back to the drawing board looking at compressors and comparing CFM.
I'm not a complete idiot - at a point, it's likely whatever I bought could be made to do the job. But at the cost of this stuff I'm inclined to buy once or not at all. I suppose in this case, I've picked the latter.
So - roll and tip. Rolling and tipping. This is how boats are regularly painted - apply with the roller, then lightly stroke with the brush tip. This presumably works to achieve a good even finish because boat paint is normally oil-based. Having applied thick top-coats before (varnish, mostly) - I can see how it works. Of course, I've never done this with paint, and I can only hope it has the same sort of self-levelling you can see with (i.e.) Rustins danish oil.
Backup Plan
So let's say I screw up and the paintjob is shite. I'll be trying somewhere inconspicious first - specifically the underside of the cabinet. But lets say I can't get an even finish and it looks really bad. What to do? I'm not thinking much about it now, but here's some ideas:
- Just stick with the primer. It looks pretty good, is matte, so it can be sanded to a uniform finish. Varnish-in-a-can would go on a treat. Downside would be that the primer is grey. Upside would be that grey is cool.
- Figure out spray painting. Resign myself to online-shopping purgatory until I buy something takes paint out of a tub and fires it out of a gun-shaped object. An expense I'd like to avoid.
- Take it to a boat painting place. They have the kit, I can supply the paint. Primer is already done. The problem is finding one - I live on the coast, so there'll be at least one. Probably.
- White gloss spray-in-a-can. It works, it was what I originally used, and that looked fine. Probably less than £150 in total, and I know from the first time I did this to skip straight for the 'premium' plastikote and not bother with the cheaper stuff.
Next update probably when I've had a chance to piss about with the topcoat.
2025-02-23: Painting
It was once again the weekend, which meant more painting. This time it was the first coat of gloss.
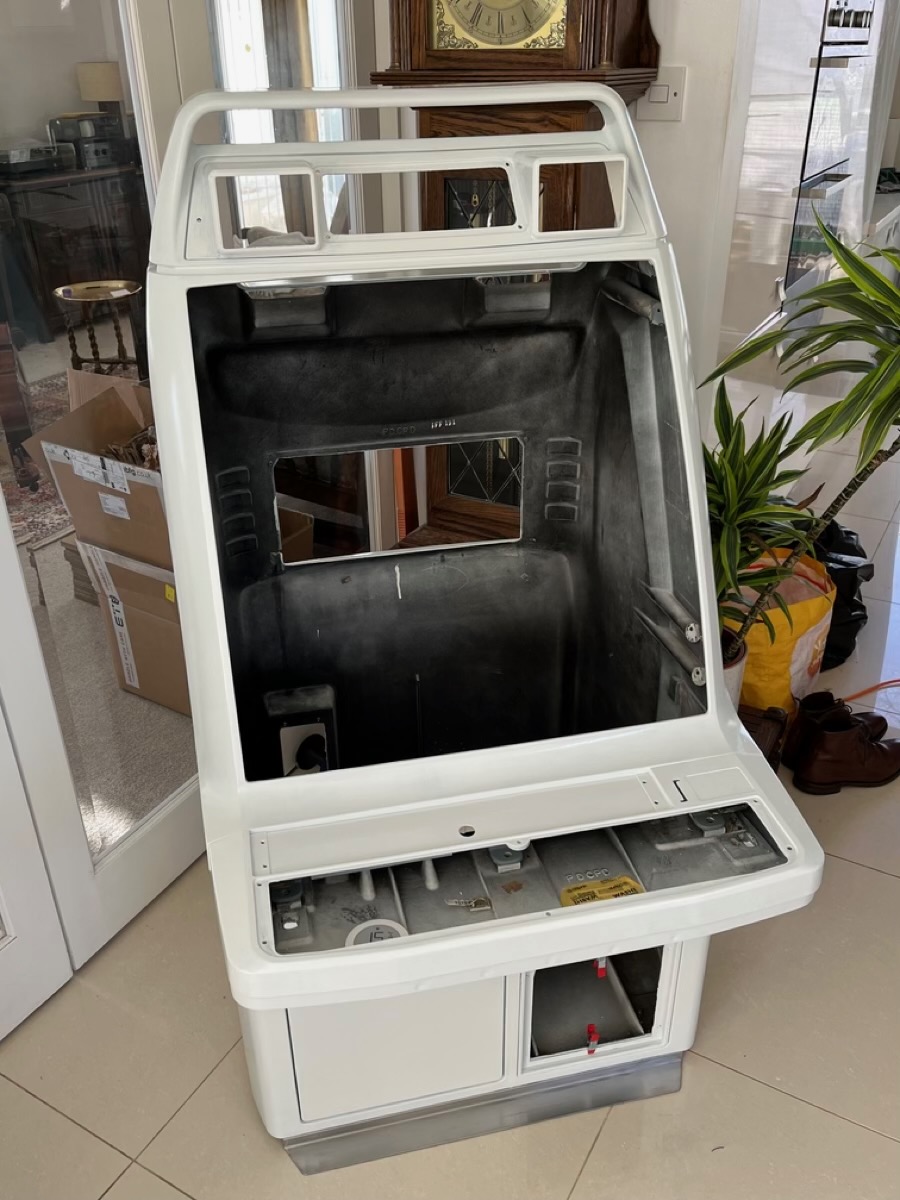
Figure 5: The glossy, loosely-assembled cabinet
Deviating from the standard
As explained in the last set of notes, I'm using Hempel's Primer Undercoat in med-grey. It has the aesthetic of a Playstation 1, which I actually found charming. How it would have looked with the marquees and side-art installed, I don't know. But the overall appearance was very nice. I think a lot of it is simply the result of matte paint providing a highly uniform finish with minimal effort - you can slap it on with as little care as you like, and it will still look like you did a proper job of it.
It did lead me to consider whether I actually wanted to stick with a factory-standard white. I'm not refurbishing this cabinet to sell, so does it really matter? Is it sacrilegious to take something with history and intentionally cast that history aside? If you asked me that question about fine hardwood furniture, I'd say it is. It really annoys me to see people buying Ercol-made ash furniture and painting it white. But here? It's a big old video game machine. 90% of them have been tinted by smoke, burnt with fag-ends, scratched to bits, and occasionally spilled upon. The authentic candy cabinet is a knocked-about piece of junk.
I ultimately decided that I wanted it to be visually similar to the factory finish, but would keep Hempel's matte Bilge and Locker Paint in the back of my mind, in case it became apparent a high-quality gloss finish with a roller and brush is impossible. Thankfully, that didn't come to pass.
Painting
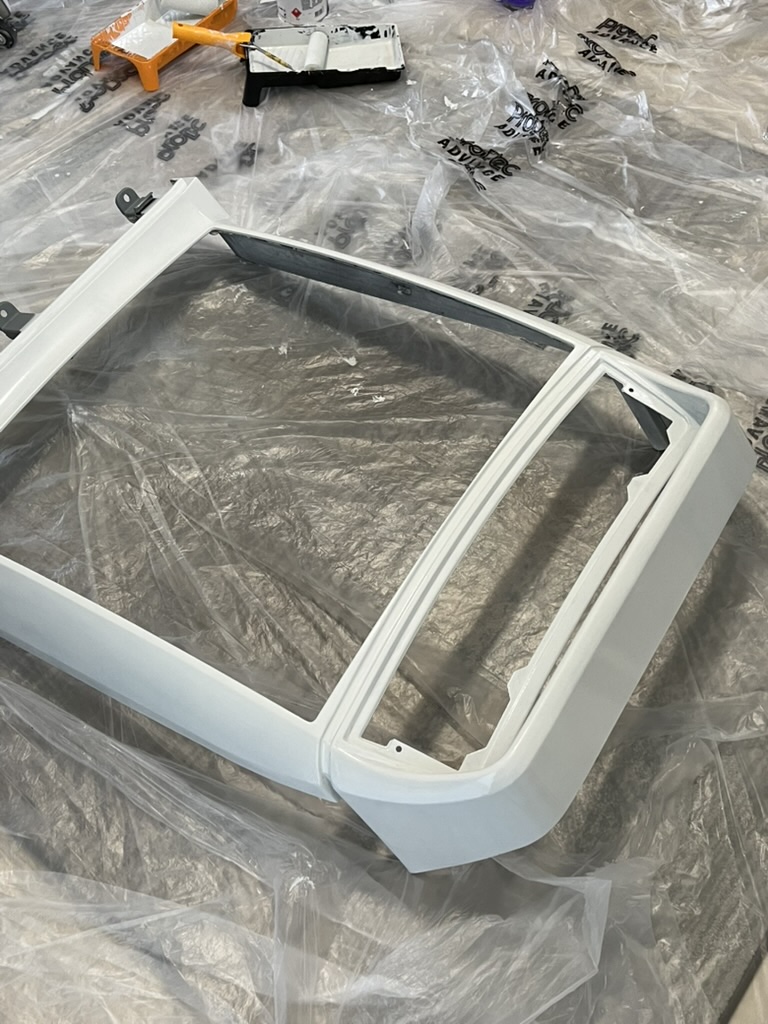
Figure 6: Close-up of the gloss on a corner
Now that I have the first layer applied, here's my tips for applying Hempel's high gloss paint:
- Hoover. Cover everything with polythene dust sheets. Wear tight-fitting clothing, ideally synthetic materials. Wear surgical gloves. Be bald. Dust and hair are the enemy.
- Use disposable equipment. Paint tray covers, a big bag of 4in foam rollers, a stack of unused paintbrushes. Synthetic vs natural hair brushes doesn't matter - just don't buy shite that sheds bristles.
- Work quickly. Very quickly. You have maybe 30 minutes before the paint you've poured into the roller tray begins to clump. When this happens, you'll end up with nasty little blobs of paint getting in the way while tipping. At that point, just stop. Whatever tools you're using go in the bin. Yeah, it's a waste, but you aren't going to be able to clean oil-based boat-paint off those bristles.
- Accept the inevitable. The finish will be okay, but it will not be great. You should have taken it to a place with professional spraying services if you wanted that.
Next Step
I have another layer to go, at which point I think I may be finished. There's no rush, so I'm going to be leaving it a full week, scuffing it down with the aformentioned black finishing pads, wiping that down, and then applying the next coat. The 750ml I started with is maybe 2/3 empty now, so 2x750ml tins seems to be the right amount. £19.80 each, VAT-inclusive.
However it is entirely possible I'll obsess over the final layer on parts like the control panel. The back and sides can be just okay, but the control panel needs to be a little better than that, as it's the key feature.
2025-05-21: Power Wiring
Small update, just to encourage myself to continue documenting the process. Arcooda unfortunately needed to push back the release of their replacement 27.5” LCD display.

Figure 7: The assembled New Astro City cabinet
Rather than leave everything in bits in my dining room, I decided I'd get the power wiring done and put things back together. While I'm not running the cabinet on 240v (instead using a 240->100v stepdown converter), I did print a new backplate with an IEC socket and illuminated AC switch, which connects to new power supply, rather than the original, problem-ridden NVS-4000. The new supply can run on 240v and 100v, so it leaves me in a comfortable position when I do replace the display.
Wiring
Rather than reuse the wires that were there, I've opted for new whenever possible, with AMP-UP connectors when possible. Case in point, the display connector:
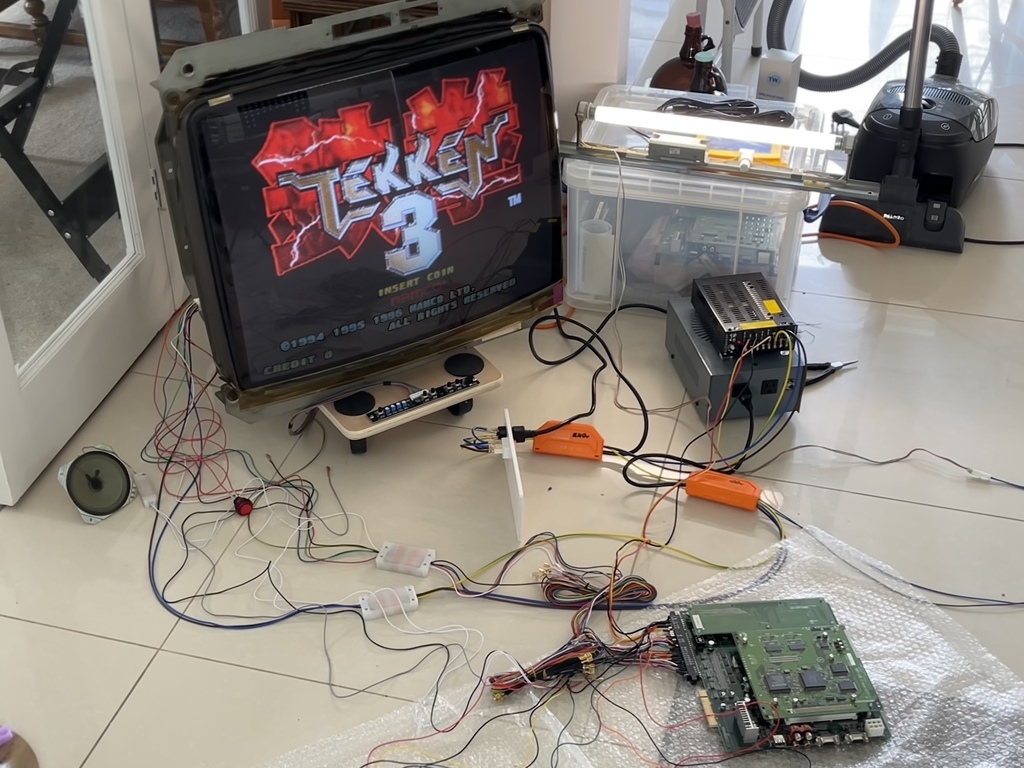
Figure 8: Testing the connectors
As a general principle, one side of each wire is bare and terminated into a Wago splicing connector. The other side is either AMP-UP, or some form of spade connector. The intent behind this is to make it trivial to change out components like the display and speakers. Just open up the junction box, lift the lever of Wago connector, remove the old wire, insert the new, press down the lever.
It also helps that it saves on AMP-UP connectors. While I have a pretty good selection of places to purchase those connectors, they still cost a fair whack. And they're a massive pain to deal with when the wire slips out of the female pin (which then remains stuck inside the now-unusable male connector).
Next Update
I haven't wired the controls. That's a long and boring (meditative?) job. I'm leaving it for a quiet few days off. Prospective work includes replacing the CFL tube with some sort of LED solution, replacing the speakers with something less treble-y. These, I think, are problems to tackle once I'm in a position to replace the CRT. I also need to touch-up the paint on the coin-door hinge, which cracked during re-assembly.
To wit, the next update is really contigent on Arcooda releasing their 27.5” LCD. Cheerio.